深度卷积生成对抗网络
DCGAN的框架
DCGAN设计规则
为了使GAN能够很好地适应卷积神经网络架构,DCGAN提出了四点架构设计规则,分别是:
- 使用卷积层替代池化层
- 去除全连接层
- 使用批归一化(batch normalization)
- 使用恰当的激活函数
详细解释:
第一点:把传统卷积网络中的池化层全部去除,使用卷积层代替。
对于判别器,我们使用步长卷积(strided convolution)来代替池化层;
对于生成器,我们使用分数步长卷积(fractional-strided convolutions)来代替池化层。

上图(步长卷积)表示了卷积层如何在判别器中进行空间下采样(spatial downsampling),输入数据为5×5的矩阵,使用了3×3的过滤器,步长为2×2,最终输出为3×3的矩阵。

上图(分数步长卷积)表示的是卷积层在生成器中进行上采样(spatial upsampling),输入为3×3的矩阵,同样使用了3×3过滤器,反向步长为2×2,故在每个输入矩阵的点之间填充一个0,最终输出为5×5。
使用上述卷积层替代池化层的目的是让网络自身去学习空间上采样与下采样,使得判别器和生成器都能够有效具备相应的能力。
第二点:设计规则是去除全连接层。
论文中说的一种折中方案是将生成器的随机输入直接与卷积层特征输入进行连接,同样地,对于判别器的输出层也是与卷积层的输出特征连接。
第三点:设计规则是使用批归一化。
由于深度学习的神经网络层数很多,每一层都会使得输出数据的分布发生变化,随着层数的增加,网络的整体偏差会越来越大。
批归一化的目标则是解决这一问题,通过对每一层的输入进行归一化处理,能够有效使得数据服从某个固定的数据分布。
下面是批归一化论文中给出的实现方法,输入的批次为$B = {x_{1 … m}}$,其中需要学习的参数为$\gamma,\beta$,最终输出为${y_i= BN_{\gamma,\beta}(x_i)}$。其中最后一步的线性变换是希望网络能够在归一化的基础上还原原始输入。
$$ \mu_B \leftarrow \frac{1}{m}\sum^m_{i=1}x_i \tag{1} $$
$$ \sigma_1B^2 \leftarrow \frac{1}{m}\sum^m_{i=1}(x_i-\mu_B)^2 \tag{2} $$
$$ \hat{x}_i \leftarrow \frac{x_i-\mu_B}{\sqrt{\sigma_B^2+\epsilon}} \tag{3} $$
$$ y_i \leftarrow \gamma\hat{x}_i+\beta \equiv BN_{\gamma,\beta}(x_i)\tag{4} $$
第四点:对于激活函数的设计。
激活函数的作用是在神经网络中进行非线性变换,下面先介绍几种神经网络中常用的激活函数。
Sigmoid函数是一种非常常用的激活函数,公式为$\sigma(x)=\frac{1}{1+e^{-x}}$。
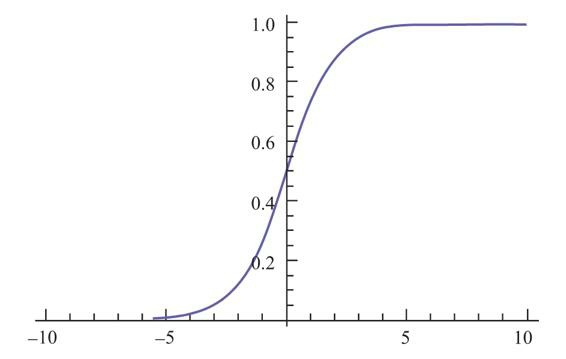
该函数的取值范围在0到1之间,当x大于0时输出结果会趋近于1,而当x小于0时输出结果趋向于0,由于函数的特性,经常用作0-1二分类的输出端。
但是Sigmoid函数有两个比较大的缺陷:
- 其一是当输入数据很大或很小的时候,函数的梯度几乎接近于0,这对神经网络在反向传播中的学习非常不利;
- 其二是Sigmoid函数的均值不是0,这使得神经网络的训练过程中只会产生全正或全负的反馈
Tanh函数把数据压缩到−1到1的范围,解决了Sigmoid函数均值不为0的问题,所以在实践中通常Tanh函数都优于Sigmoid函数。
在数学形式上Tanh只是对Sigmoid的一个缩放变形,公式为$tanh(x)=2\sigma(2x)-1$
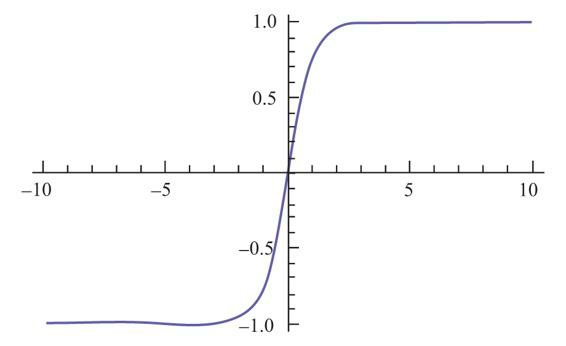
ReLU(The Rectified Linear Unit)函数是最近几年非常流行的激活函数,它的计算公式非常简单,即$f(X)=max(0,x)$
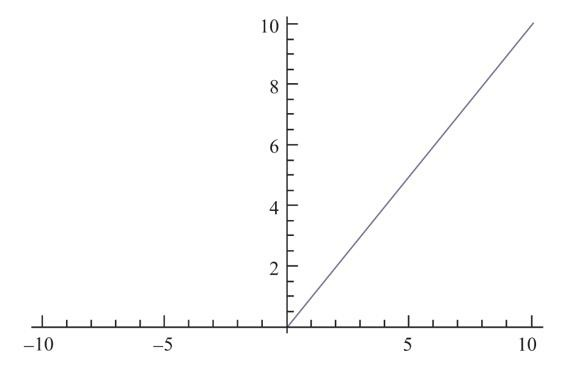
它有几个明显的优点:
- 首先是计算公式非常简单,不用像上面介绍的两个激活函数的计算那么复杂
- 其次是它被发现在随机梯度下降中比Sigmoid和Tanh更加容易使得网络收敛。
但ReLU的问题在于,ReLU在训练中可能会导致出现某些神经元永远无法更新的情况。其中一种对ReLU的改进方式是LeakyReLU,该方法与ReLU不同的是,在$x<0$时取$f(x) = αx$,其中α是一个非常小的斜率(例如0.01)。这样的修改可以使得当$x<0$时也不会使得反向传导时的梯度消失。
DCGAN网络框架中,生成器和判别器使用了不同的激活函数来设计。
生成器中使用ReLU函数,但对于输出层使用了Tanh激活函数,因为研究者在实验中观察到使用有边界的激活函数可以让模型更快地进行学习,并能快速覆盖色彩空间。
而在判别器中对所有层均使用LeakyReLU,在实际使用中尤其适用于高分辨率的图像判别模型。
这些激活函数的选择是研究者在多次的实验测试中得出的结论,可以有效使得DCGAN得到最优的结果。
DCGAN框架结构
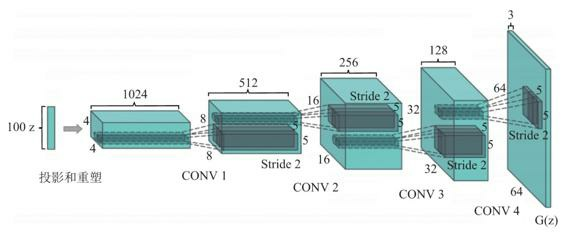
如图所示是DCGAN生成器G的架构图,输入数据为100维的随机数据z,服从范围在[−1,1]的均匀分布,经过一系列分数步长卷积后,最后形成一幅64×64×3的RGB图片,与训练图片大小一致。
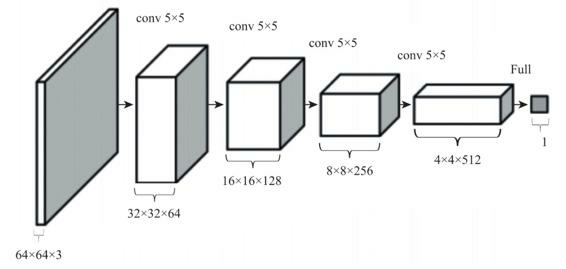
对于判别器D的架构,基本是生成器G的反向操作,如图所示。输入层为64×64×3的图像数据,经过一系列卷积层降低数据的维度,最终输出的是一个二分类数据。
下面是训练过程中的一些细节设计:
- 对于用于训练的图像数据样本,仅将数据缩放到[−1,1]的范围内,这也是Tanh的取值范围,并不做任何其他处理。
- 模型均采用Mini-Batch大小为128的批量随机梯度下降方法进行训练。权重的初始化使用满足均值为0、方差为0.02的高斯分布的随机变量。
- 对于激活函数LeakyReLU,其中Leak的部分设置斜率为0.2。
- 训练过程中使用Adam优化器进行超参数调优。学习率使用0.000 2,动量$\beta_1$取值0.5,使得训练更加稳定。
DCGAN 的工程实践
尝试使用pytorch框架来实现一下最基本的生成对抗网络。
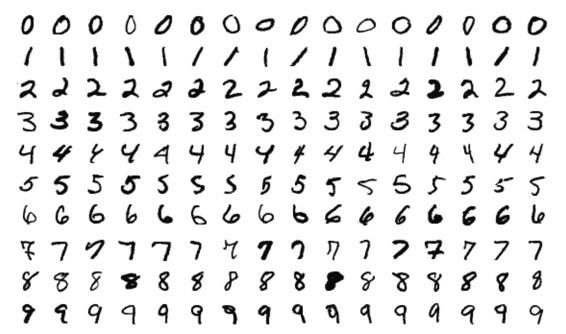
首先让我们来认识一下基础数据集MNIST(Modified National Institute of Standards and Technology),之前我们大量提及了手写数字数据集,在这里让我们来重点介绍一下这个MNIST数据集。MNIST数据集的数据内容如图所示,是手写的阿拉伯数字,范围从0到9。在大量的机器学习框架中,都会默认自带这样一个数据库,用于对于开发模型进行标签训练与测试。常规的MNIST测试集中包含了60 000组训练图片与10 000组测试图片。
我们希望生成对抗网络能够在MNIST数据集的基础上自动生成手写数字的图像,并且希望能够和手写的效果尽量保持一致。
导入模块
import os
import time
import torch
import torch.nn as nn
from torch.utils.data import DataLoader
from torchvision import utils, datasets, transforms
import matplotlib.pyplot as plt
import matplotlib.animation as animation
from IPython.display import HTML
设置随机种子
# 设置随机种子,以便复现实验结果。
torch.manual_seed(0)
超参数配置
- dataroot:存放数据集文件夹所在的路径
- workers :多进程加载数据所用的进程数
- batch_size:训练时batch的大小. DCGAN 论文中使用的是 128
- image_size:训练图像的维度。默认是64×64。如果需要其它尺寸,必须更改 D和 G的结构,点击这里查看详情
- nc:输入图像的通道数。对于彩色图像是3
- nz:隐向量的维度(即来自标准正态分布的隐向量的维度)(也即高斯噪声的维度)
- ngf:与通过生成器进行的特征映射的深度有关 生成器的特征图数量(即进行最后一次卷积转置层时,out_channels为3时的in_channels)
- ndf:设置通过鉴别器传播的特征映射的深度 判别器的特征图数量(即进行第一次卷积时,in_channels为3时的out通道数)
- num_epochs:训练的总轮数。训练的轮数越多,可能会导致更好的结果,但也会花费更长的时间
- lr:学习率。DCGAN论文中用的是0.0002
- beta1:Adam优化器的参数beta1。论文中,值为0.5
- ngpus:可用的GPU数量。如果为0,代码将在CPU模式下运行;如果大于0,它将在该数量的GPU下运行
# Root directory for dataset
dataroot = "./data"

# Number of workers for dataloader
workers = 12

# Batch size during training
batch_size = 100

# Spatial size of training images. All images will be resized to this size using a transformer.
image_size = 64

# Number of channels in the training images. For color images this is 3
nc = 1

# Size of z latent vector (i.e. size of generator input)
nz = 100

# Size of feature maps in generator
ngf = 64

# Size of feature maps in discriminator
ndf = 64

# Number of training epochs
num_epochs = 5

# Learning rate for optimizers
lr = 0.0002

# Beta1 hyperparam for Adam optimizers
beta1 = 0.5

# Number of GPUs available. Use 0 for CPU mode.
ngpu = 1
数据集
使用mnist数据集,其中训练集6万张,测试集1万张,我们这里不是分类任务,而是使用gan的生成任务,所以就不分训练和测试了,全部图像都可以利用。
mnist_transform = transforms.Compose([
    transforms.Resize(image_size),
    transforms.ToTensor(),
    transforms.Normalize((0.1307,), (0.3081,))
])
train_data = datasets.MNIST(
    root=dataroot,
    train=True,
    transform=mnist_transform,
    download=True
)
test_data = datasets.MNIST(
    root=dataroot,
    train=False,
    transform=mnist_transform
)
dataset = train_data+test_data
print(f'Total Size of Dataset: {len(dataset)}')
输出:
Total Size of Dataset: 70000数据加载器
dataloader = DataLoader(
    dataset=dataset,
    batch_size=batch_size,
    shuffle=True,
    num_workers=workers
)
选择训练设备
检测cuda是否可用,可用就用cuda加速,否则使用cpu训练。
device = torch.device('cuda:0' if (torch.cuda.is_available() and ngpu > 0) else 'cpu')训练数据可视化
inputs = next(iter(dataloader))[0]
plt.figure(figsize=(10,10), dpi=100)
plt.title("Training Images")
plt.axis('off')
inputs = utils.make_grid(inputs[:100], nrow=10)
plt.imshow(inputs.permute(1, 2, 0))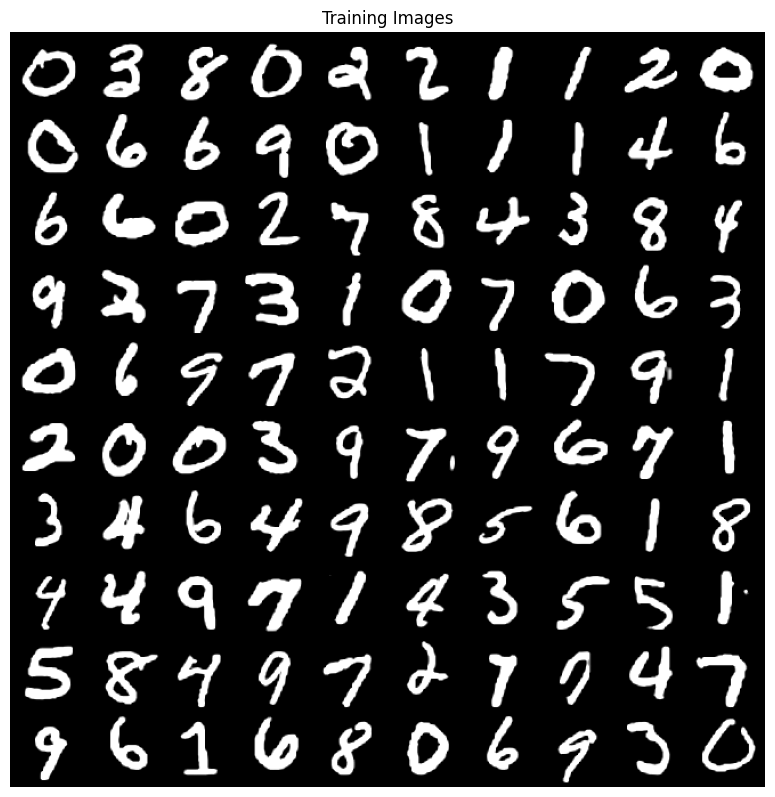
权重初始化
在dcgan论文中,作者指出所有模型权重应当从均值为0,标准差为0.02的正态分布中随机初始化。但这里不建议使用,亲测使用后效果很差。
def weights_init(m):
    classname = m.__class__.__name__
    if classname.find('Conv') != -1:
        nn.init.normal_(m.weight.data, 0.0, 0.02)
    elif classname.find('BatchNorm') != -1:
        nn.init.normal_(m.weight.data, 1.0, 0.02)
        nn.init.constant_(m.bias.data, 0)
生成器
生成器的结构: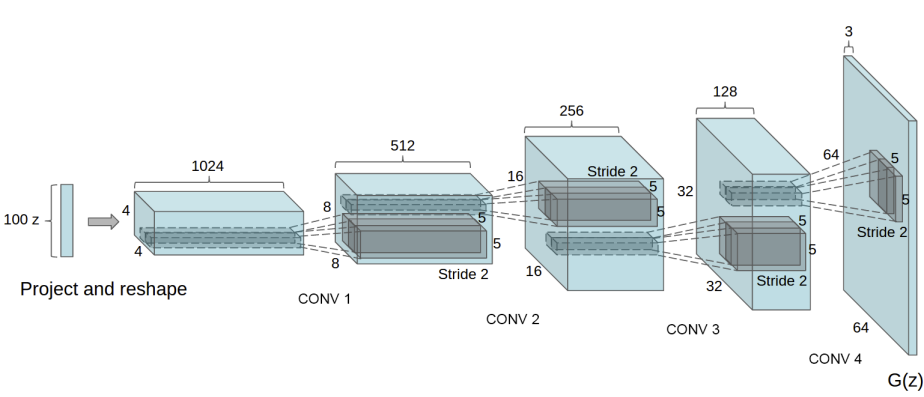
构建生成器类:
class Generator(nn.Module):
    def __init__(self, ngpu):
        super(Generator, self).__init__()
        self.ngpu = ngpu
        self.main = nn.Sequential(
            # input is Z, going into a convolution
            nn.ConvTranspose2d(nz, ngf * 8, 4, 1, 0, bias=False), # 逆卷积 上采样
            nn.BatchNorm2d(ngf * 8),    # 批归一化
            nn.ReLU(True),
            # state size. (ngf*8) x 4 x 4
            nn.ConvTranspose2d(ngf * 8, ngf * 4, 4, 2, 1, bias=False),
            nn.BatchNorm2d(ngf * 4),
            nn.ReLU(True),
            # state size. (ngf*4) x 8 x 8
            nn.ConvTranspose2d(ngf * 4, ngf * 2, 4, 2, 1, bias=False),
            nn.BatchNorm2d(ngf * 2),
            nn.ReLU(True),
            # state size. (ngf*2) x 16 x 16
            nn.ConvTranspose2d(ngf * 2, ngf, 4, 2, 1, bias=False),
            nn.BatchNorm2d(ngf),
            nn.ReLU(True),
            # state size. (ngf) x 32 x 32
            nn.ConvTranspose2d(ngf, nc, 4, 2, 1, bias=False),
            nn.Tanh()
            # state size. (nc) x 64 x 64
        )

    def forward(self, input):
        return self.main(input)
生成器实例化:
# Create the generator
netG = Generator(ngpu).to(device)

# Handle multi-gpu if desired
if device.type == 'cuda' and ngpu > 1:
    netG = nn.DataParallel(netG, list(range(ngpu)))

# Apply the weights_init function to randomly initialize all weights to mean=0, stdev=0.2.
# netG.apply(weights_init)
3.10. 判别器
构建判别器类:
class Discriminator(nn.Module):
    def __init__(self, ngpu):
        super(Discriminator, self).__init__()
        self.ngpu = ngpu
        self.main = nn.Sequential(
            # input is (nc) x 64 x 64
            nn.Conv2d(nc, ndf, 4, 2, 1, bias=False),
            nn.LeakyReLU(0.2, inplace=True),
            # state size. (ndf) x 32 x 32
            nn.Conv2d(ndf, ndf * 2, 4, 2, 1, bias=False),
            nn.BatchNorm2d(ndf * 2),
            nn.LeakyReLU(0.2, inplace=True),
            # state size. (ndf*2) x 16 x 16
            nn.Conv2d(ndf * 2, ndf * 4, 4, 2, 1, bias=False),
            nn.BatchNorm2d(ndf * 4),
            nn.LeakyReLU(0.2, inplace=True),
            # state size. (ndf*4) x 8 x 8
            nn.Conv2d(ndf * 4, ndf * 8, 4, 2, 1, bias=False),
            nn.BatchNorm2d(ndf * 8),
            nn.LeakyReLU(0.2, inplace=True),
            # state size. (ndf*8) x 4 x 4
            nn.Conv2d(ndf * 8, 1, 4, 1, 0, bias=False),
            # state size. (1) x 1 x 1
            nn.Sigmoid()
        )

    def forward(self, input):
        return self.main(input)
判别器实例化:
# Create the Discriminator
netD = Discriminator(ngpu).to(device)

# Handle multi-gpu if desired
if device.type == 'cuda' and ngpu > 1:
    netD = nn.DataParallel(netD, list(range(ngpu)))

# Apply the weights_init function to randomly initialize all weights to mean=0, stdev=0.2.
# netD.apply(weights_init)
优化器和损失函数
# Initialize BCELoss function
criterion = nn.BCELoss()

# Create batch of latent vectors that we will use to visualize the progression of the generator
fixed_noise = torch.randn(100, nz, 1, 1, device=device)
# print(f'Size of Latent Vector: {fixed_noise.size()}')

# Establish convention for real and fake labels during training
real_label = 1.
fake_label = 0.

# Setup Adam optimizers for both G and D
optimizerD = torch.optim.Adam(netD.parameters(), lr=lr, betas=(beta1, 0.999))
optimizerG = torch.optim.Adam(netG.parameters(), lr=lr, betas=(beta1, 0.999))
开始训练
第一部分——训练判别器(Part 1 - Train the Discriminator)
回想一下,判别器的训练目的是最大化输入正确分类的概率。从Goodfellow的角度来看,我们希望“通过随机梯度的变化来更新鉴别器”。实际上,我们想要最大化$$log(D(x))+log(1−D(G(z)))$$。为了区别mini-batch,ganhacks建议分两步计算。第一步,我们将会构造一个来自训练数据的真图片batch,作为判别器D的输入,计算其损失$$loss(log(D(x))$$,调用backward方法计算梯度。第二步,我们将会构造一个来自生成器G的假图片batch,作为判别器D的输入,计算其损失$$loss(log(1−D(G(z)))$$,调用backward方法累计梯度。最后,调用判别器D优化器的step方法更新一次模型(即判别器D)的参数。
第二部分——训练生成器(Part 2 - Train the Generator)
如原论文所述,我们希望通过最小化$$log(1−D(G(z)))$$训练生成器G来创造更好的假图片。作为解决方案,我们希望最大化$$log(D(G(z)))$$。通过以下方法来实现这一点:使用判别器D来分类在第一部分G的输出图片,计算损失函数的时候用真实标签(记做GT),调用backward方法更新生成器G的梯度,最后调用生成器G优化器的step方法更新一次模型(即生成器G)的参数。使用真实标签作为GT来计算损失函数看起来有悖常理,但是这允许我们可以使用BCELoss的log(x)部分而不是log(1−x)部分,这正是我们想要的。
以展示每个迭代完成之后我们的固定噪声通过生成器G产生的图片信息。训练过程中统计数据报告如下:
- Loss_D :真假batch图片输入判别器后,所产生的损失总和((log(D(x)) + log(D(G(z))))).
- Loss_G : 生成器损失总和(log(D(G(z))))
- D(x) : 真batch图片输入判别器后,所产生的的平均值(即平均概率)。这个值理论上应该接近1,然后随着生成器的改善,它会收敛到0.5左右。
- D(G(z)) : 假batch图片输入判别器后,所产生的平均值(即平均概率)。第一个值在判别器D更新之前,第二个值在判别器D更新之后。这两个值应该从接近0开始,随着G的改善收敛到0.5。
# Training Loop

# Lists to keep track of progress
img_list = []
G_losses = []
D_losses = []
D_x_list = []
D_z_list = []
iters = 0

print("Starting Training Loop...")
# For each epoch
for epoch in range(num_epochs):
    beg_time = time.time()
    # For each batch in the dataloader
    for i, data in enumerate(dataloader):

        ############################
        # (1) Update D network: maximize log(D(x)) + log(1 - D(G(z)))
        ###########################
        ## Train with all-real batch
        netD.zero_grad()
        # Format batch
        real_cpu = data[0].to(device)
        b_size = real_cpu.size(0) # 64*8
        label = torch.full((b_size,), real_label, dtype=torch.float, device=device)

        # Forward pass real batch through D
        output = netD(real_cpu).view(-1) # output.size()=[128]

        # Calculate loss on all-real batch
        errD_real = criterion(output, label)
        # Calculate gradients for D in backward pass
        errD_real.backward()
        D_x = output.mean().item()

        ## Train with all-fake batch
        # Generate batch of latent vectors
        noise = torch.randn(b_size, nz, 1, 1, device=device)
        # Generate fake image batch with G
        fake = netG(noise)
        label.fill_(fake_label)
        # Classify all fake batch with D
        output = netD(fake.detach()).view(-1)
        # Calculate D's loss on the all-fake batch
        errD_fake = criterion(output, label)
        # Calculate the gradients for this batch
        errD_fake.backward()
        D_G_z1 = output.mean().item()
        # Add the gradients from the all-real and all-fake batches
        errD = errD_real + errD_fake
        # Update D
        optimizerD.step()

        ############################
        # (2) Update G network: maximize log(D(G(z)))
        ###########################
        netG.zero_grad()
        label.fill_(real_label)  # fake labels are real for generator cost
        # Since we just updated D, perform another forward pass of all-fake batch through D
        output = netD(fake).view(-1)
        # Calculate G's loss based on this output
        errG = criterion(output, label)
        # Calculate gradients for G
        errG.backward()
        D_G_z2 = output.mean().item()
        # Update G
        optimizerG.step()

        # Output training stats
        end_time = time.time()
        run_time = round(end_time-beg_time)
        print(
            f'Epoch: [{epoch+1:0>{len(str(num_epochs))}}/{num_epochs}]',
            f'Step: [{i+1:0>{len(str(len(dataloader)))}}/{len(dataloader)}]',
            f'Loss-D: {errD.item():.4f}',
            f'Loss-G: {errG.item():.4f}',
            f'D(x): {D_x:.4f}',
            f'D(G(z)): [{D_G_z1:.4f}/{D_G_z2:.4f}]',
            f'Time: {int(run_time/60)}m{run_time%60}s',
            end='\r'
        )

        # Save Losses for plotting later
        G_losses.append(errG.item())
        D_losses.append(errD.item())

        # Save D(X) and D(G(z)) for plotting later
        D_x_list.append(D_x)
        D_z_list.append(D_G_z2)


        # Check how the generator is doing by saving G's output on fixed_noise
        iters += 1
        if (iters % 100 == 0) or ((epoch == num_epochs-1) and (i == len(dataloader)-1)):
            with torch.no_grad():
                fake = netG(fixed_noise).detach().cpu()
            img_list.append(utils.make_grid(fake, nrow=10))
    print()
输出:
Starting Training Loop...
Epoch: [1/5] Step: [700/700] Loss-D: 8.8328 Loss-G: 5.1051 D(x): 0.9995 D(G(z)): [0.9989/0.0200] Time: 1m6s
Epoch: [2/5] Step: [700/700] Loss-D: 2.5174 Loss-G: 0.7627 D(x): 0.1362 D(G(z)): [0.0006/0.5085] Time: 1m8s
Epoch: [3/5] Step: [700/700] Loss-D: 0.0355 Loss-G: 4.4222 D(x): 0.9767 D(G(z)): [0.0113/0.0163] Time: 1m8s
Epoch: [4/5] Step: [700/700] Loss-D: 0.9482 Loss-G: 1.9022 D(x): 0.6590 D(G(z)): [0.3345/0.1798] Time: 1m8s
Epoch: [5/5] Step: [700/700] Loss-D: 0.0939 Loss-G: 3.1018 D(x): 0.9168 D(G(z)): [0.0025/0.0698] Time: 1m8s
训练过程中的损失变化
plt.figure(figsize=(10, 5))
plt.title("Generator and Discriminator Loss During Training")
plt.plot(G_losses[::100], label="G")
plt.plot(D_losses[::100], label="D")
plt.xlabel("iterations")
plt.ylabel("Loss")
plt.legend()
plt.show()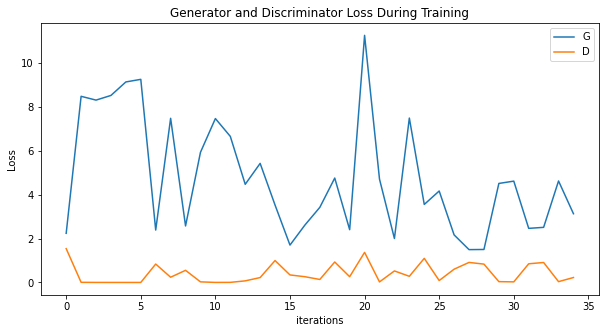
训练过程中的D(x)和D(G(z))变化
plt.figure(figsize=(10, 5))
plt.title("D(x) and D(G(z)) During Training")
plt.plot(D_x_list[::100], label="D(x)")
plt.plot(D_z_list[::100], label="D(G(z))")
plt.xlabel("iterations")
plt.ylabel("Probability")
plt.legend()
plt.show()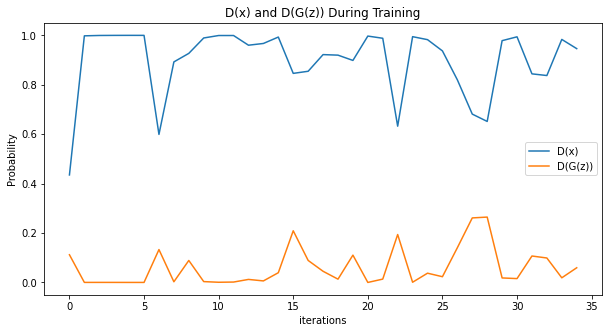
可视化G的训练过程
fig = plt.figure(figsize=(10, 10), dpi=100)
fig = plt.figure()
plt.axis("off")
ims = [[plt.imshow(item.permute(1, 2, 0), animated=True)] for item in img_list]
ani = animation.ArtistAnimation(fig, ims, interval=1000, repeat_delay=1000, blit=True)
HTML(ani.to_jshtml())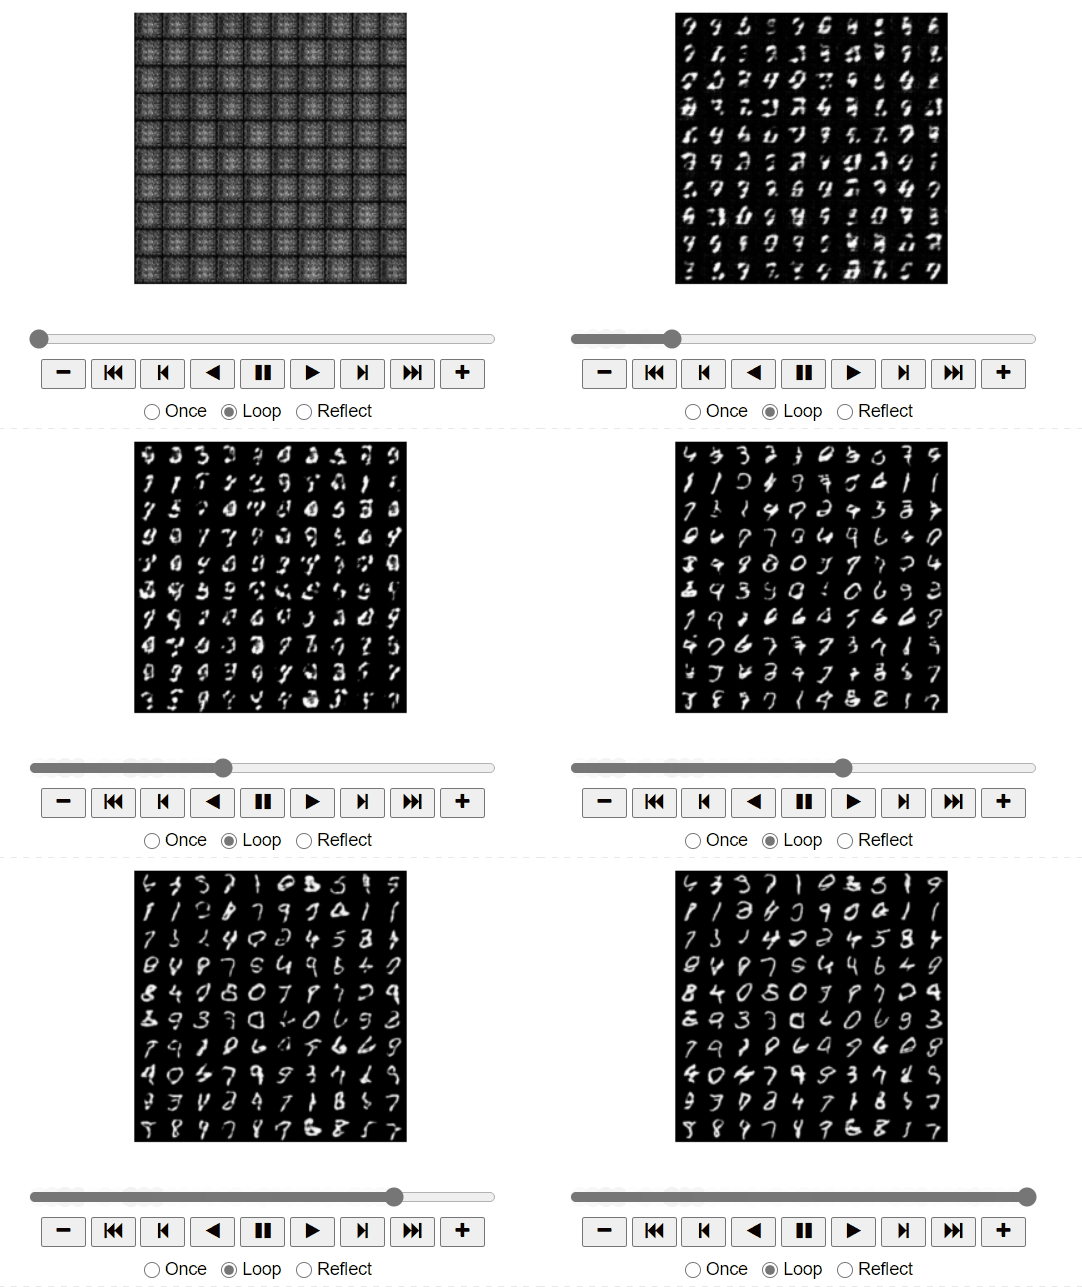
真图 vs 假图
# Grab a batch of real images from the dataloader
real_batch = next(iter(dataloader))

# Plot the real images
plt.figure(figsize=(20,10), dpi=300)
plt.subplot(1,2,1)
plt.axis("off")
plt.title("Real Images")
plt.imshow(utils.make_grid(real_batch[0][:100], nrow=10).permute(1, 2, 0))

# Plot the fake images from the last epoch
plt.subplot(1,2,2)
plt.axis("off")
plt.title("Fake Images")
plt.savefig('comparation.jpg', )
plt.imshow(transforms.Normalize((0.1307,), (0.3081,))(img_list[-1]).permute(1, 2, 0))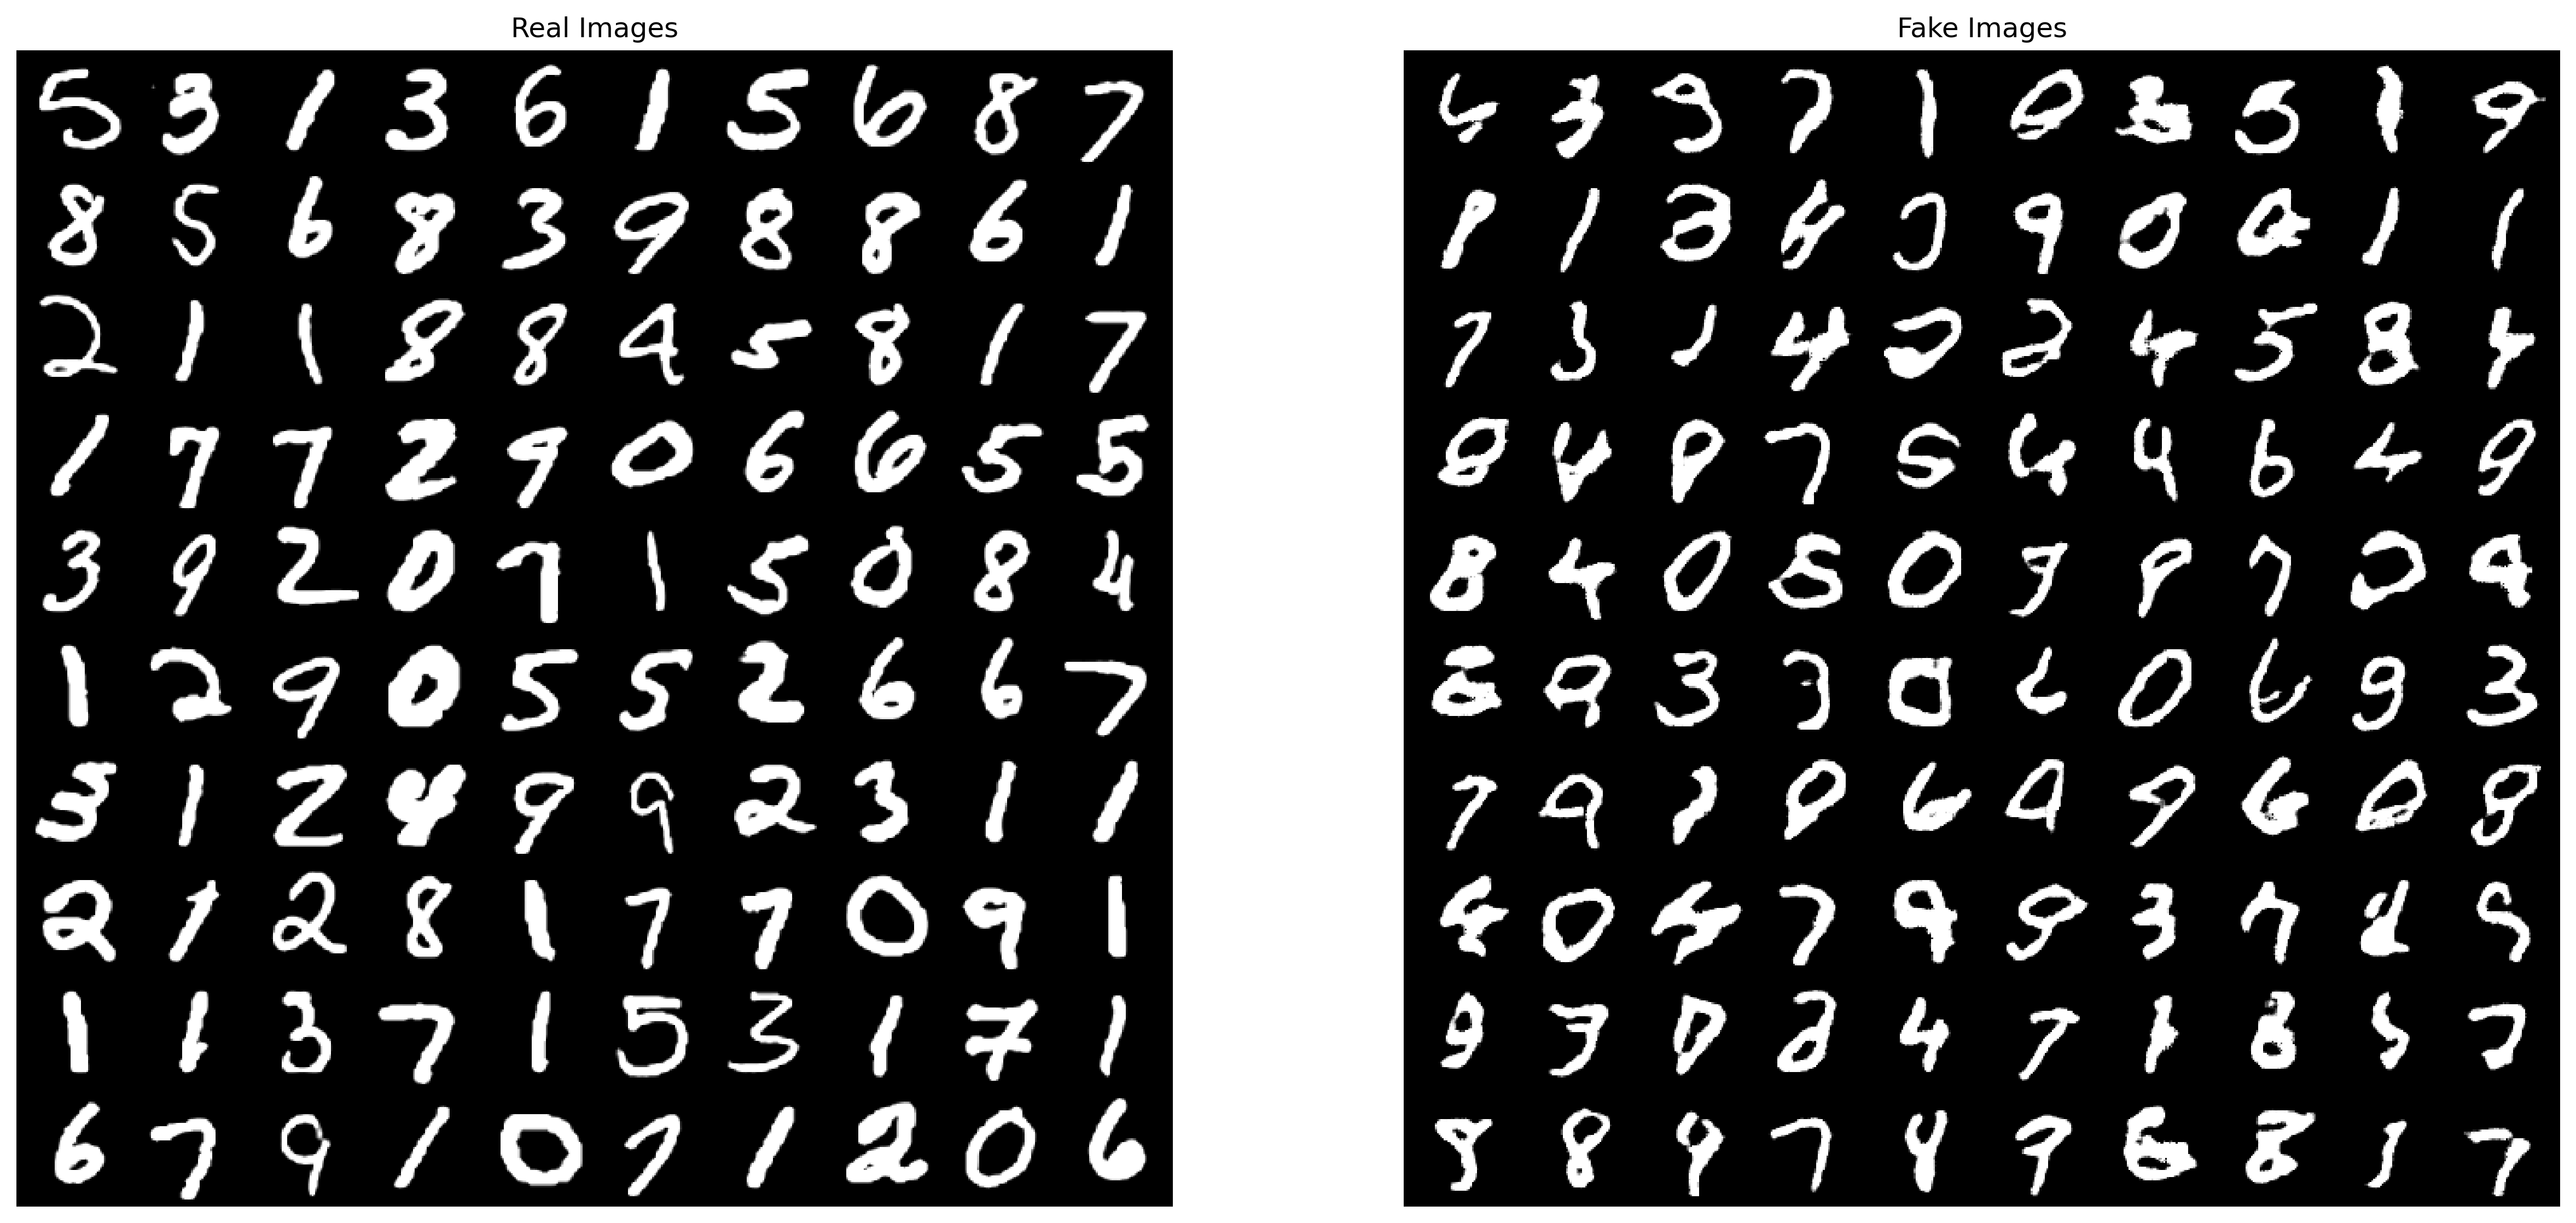
(左边是数据集中的真图,右边是生成器生成的假图)
保存网络参数
torch.save(netD.state_dict(),'./D.pth')
torch.save(netG.state_dict(),'./G.pth')